The other day I was thinking about building a replacement timer for my 30+ year
old clothes dryer. It works great mechanically but the cheesy contacts in the
cam timer welded close. I finally opened the housing and broke lose the contacts
and etc. and got the dryer back in service.
But in the "mental redesign" process, I thought of how neat it would be to have only touch switches on the front panel. Nothing to stick or jam or get wet or corroded. Or drill holes and mount and solder. I thought of capacitance switches because they have a layer of plastic between the electrical contacts and the "actuating finger" of the operator. If the switch gets too gunked up to work you just wipe it with a wet rag and it's good to go again.
But I thought that a capacitance touch switch would need to have complex circuitry to measure capacitance added by a finger tip. I figured it couldn't be more then 10pF or so. Any offset or drift would be a show stopper. Hummm.
Then I started to think just how to measure capacitance CHEAPLY. And realized I didn't really need to measure it, just see if it was more or less then a reference capacitance. If done right, the reference capacitor measuring ckt would track the "finger cap" and eliminate most error sources. Like temperature and supply variations and etc.
To be cheap the whole thing should use low parts count ICs as much as possible. It would be great if it had multiple channels, too! How many gadgets have only an ON/OFF button?
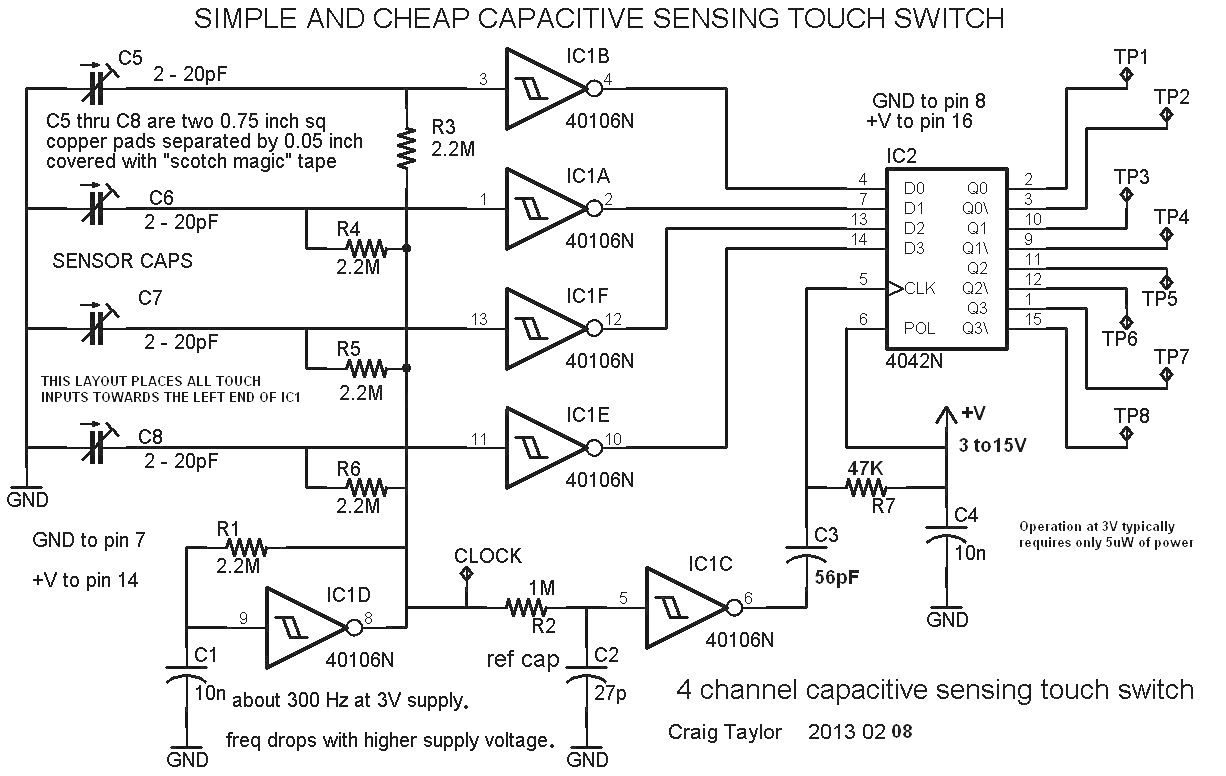
This is what finally came out of the exercise. It has four channels; three are "free" because of the 4 latches in the one 4042 CMOS part. I could NOT figure out a practical 1 channel device that used only one chip. One of you guys can do that!
Operation is as follows:
First, note that the input impedance of the Schmitt inverter is two mosfet gates. About 7pF of capacitance and a zillion Ohm resistor. Well, at least 100 megOhms at reasonable operating temperatures. A serious bonus is that the 6 inverters will track each other closely because they are made only microns apart on the same slice of silicon. They are about as near to identical as two parts can be.
IC1D, R1 and C1 form a simple square wave output clock. With a 3V supply, the clock runs at about 300Hz. Rise and fall times at pin 8 are sub us.
R2 and C2 make up the Reference time constant. It has a fixed RC ramp for comparing with the finger sensor ramp. Something not obvious is that there is a 5-7 pF capacitor between pin 5 and gnd of IC1C. So the effective value of C2 is 33pF.
Now look at IC1E. Note that the CLK signal couples to the "sensor capacitor" C8 thru a 2.2Meg resistor, which also connects to pin 11; the same way that R2 connects to pin 5. But in this case the floating capacitor plate is a piece of sheet copper about 3/4 inch square on the circuit board. Next to it is another piece of copper that is grounded. The two are separated by about 0.05 inch of bare board and both are covered with a single layer of plastic tape. I used 1 inch wide transparent tape from my office desk dispenser. You have a wide choice in sizes and colors, as long as it is an insulator and not too thick.
The important part is that when you place your finger tip on the line between the hot and ground capacitor plates, your finger becomes a conductive "bridge" electrode that raises the effective capacitance to gnd of the sensor cap from about 8pF to over 20pF. I easily measured 50 pF with firm pressure. A very light pressure will produce 17-20pf. Your results may vary.
Since we know the "no finger" capacitance of C8 is about 6pF from pin 11 and maybe 2pF stray board capacitance, we end up with an R6-C8 time constant of 2.2E6 x 8pF = 18us. Each extra pF from a finger adds about 2.2us to the signal. I chose a reference time constant of 33us because it was around half of the finger-no finger times. That is, to exceed 33us reference threshold we need: 33-18 = 15us. 15us/2.2 = 7pF . We already know that we can easily add at least 9pF with very light pressure, so the design is a GO.
We have a signal/no-signal margin of 33-18 = 15us . Since 15us is very easy to resolve with old style 40XX logic running on 3V, we shouldn't have any problems detecting the difference between the finger and no-finger capacitance. We do need to watch out for any noise that gives a sample-to-sample time variation of close to 15us, or we might have an ON signal one sample period and an OFF signal the next. That would be hard for the downstream electronics to handle. Not good.
The rest of the ckt is strictly digital. If there is no finger on the sensor, the reference sensor capacitance is low, so after the CLK signal goes high the sensor cap voltage reaches the Schmitt threshold of around 2.7V at pin 11 well before the reference voltage at pin 5 does. Therefore pin 10 switches LOW. Some number of us later the reference voltage at pin 5 reaches the threshold and pin 6 switches low. Pin 6 feeds a differentiator made up of C3 and R7, which only allows a 2us negative going pulse to reach the IC2 clock input. While the clock is low, the signals on IC2 inputs are all duplicated on the outputs. When the IC2 clock pulse returns high, the output signals are disconnected from the inputs and held in the latch output buffers.
Since Pin 10 was LOW when the clock was pulsed LOW, then the Q3 output of IC2 follows the D3 input and switches LOW at the clock time. It will stay LOW until a CLOCK cycle occurs where a finger is present and sensor Schmitt upper voltage threshold is reached some time AFTER the 33us reference time.
Simple. No critical clock or actual counting needed. Any clock slower then about 1kHz will work fine. The slower the clock, the less energy is used charging and discharging the capacitors in the circuit. Therefore less power is required.
The clock can be slowed to less then 10 Hz with no problem. Just remember that the input is only measured and updated to the output every positive clock edge. If the clock is running at 1Hz you will wait up to 1 second after touching the sensor before the output signal changes. I have my clock at 8Hz now and it seems about right from a "human speed" standpoint.
Last thing: with the supply voltage on 40XX CMOS set below around 3V, the internal dynamics of the part's front end gets interesting. No matter now slow the input signal moves (falling voltage), the lower mosfet turns OFF before the upper one turns ON. And vice versa. Therefore NO crossover current flows thru the two fets. At supply voltages over about 4V, there is always a current flow from Vcc to 0V when the input terminal of a gate is transiting from one state to the other. It could be many uA for some period.
The practical effect of this is that my bench test board draws less then 2uA from a 3.1V pair of AA cells when the clock was set to 8 Hz. That implies that if you use this circuit in a portable gadget and have it switch ON and OFF the power to the remaining circuitry, you will have a battery life of effectively the shelf life of the AA cells. Maybe 500k hours. Or over 50 years. Now THAT is handy!
Craig Taylor
2013 02 12