Wall plug transformer low wattage linear power supplies (hereinafter known as WallWarts) are available cheaply ,as surplus, from various online electronics component suppliers. Typical price is $4 to $7 for a 12VDC, 5W part. These make great line isolation and voltage reduction platforms for all sorts of useful power supplies. A $1 three terminal regulator and 3 capacitors will make a nice DC power supply.
But for analog instrumentation and mixed analog-digital circuits it’s often much easier to design and debug a circuit if the power comes from a split supply, such as +/- 5V. Frequently, many discrete components can be saved because of the availability of a “ground” at the center of the two supply voltages.
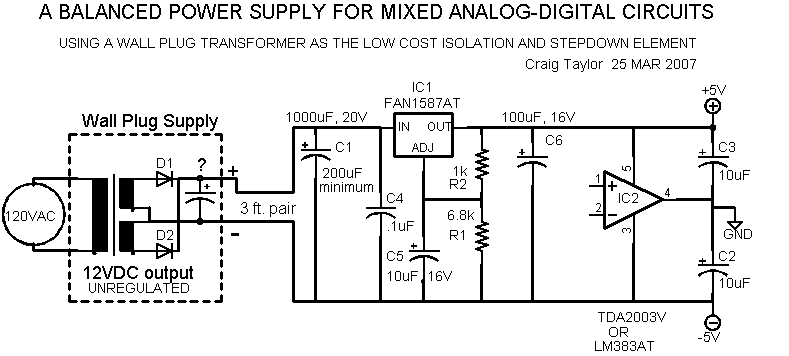
Unfortunately, building a balanced supply from a single DC voltage is not as simple as the single supply mentioned above. What we want is a “ground” at the mid-voltage of the single output voltage. That’s what this design is about.
I chose an inexpensive Audio power amplifier IC to provide the voltage dividing and power buffering part of the design. IC2 (see the schematic) has an internal voltage divider that sets the output voltage to ½ of the supply voltage between its pins 3 and 5. The internal negative feedback loop of the part either supplies current to the “GND” or sinks current from it, depending on the load characteristics, while holding pin 4 voltage at ½ IC1 output voltage. Therefore it produces what I call a “synthetic ground” at pin 4. That’s just another way of saying it holds the pin 4 voltage halfway between pins 3 and 5.
This isn’t a true earth or frame ground, of course, but the circuit it powers can’t tell the difference as long as the three outputs are held to the same voltage with respect to each other. Because the transformer in the WallWart provides a high resistance isolation from the line voltage, the GND output of the supply can be connected to earth ground, if desired. Or it can be connected to any other reference voltage of another circuit or power supply without any overt effect on the circuit operation. Always be aware that there is an unavoidable capacitance between the WW transformer primary and secondary windings that can couple high frequency common mode AC garbage through the power supply and into the load. This is true of any other line powered supply, of course.
So much for the concepts. The implementation is easy. First, a few words about IC package heatsink electrical connections. Note that the metal thermal tab of IC1 is NOT connected to the thermal tab of IC2. And NEITHER is connected to the supply GND terminal. For any but the lowest output power, both IC1 and IC2 need some type of heatsink. Probably the easiest for less than 2W or so output power is to electrically isolate 1 or 2 square inches of PCB copper act as the HS for each of the two parts to. Just use thermal conductive grease and bolt the IC to the PCB copper. No insulating hardware needed.
For somewhat higher power, a standard “aluminum finger” heatsink can be placed between the ICs and the PCB. Grease both contact areas. If you can touch the metal tab of the part when the supply has been running under load for 10 minutes, then you have enough heatsink. If the tab temperature is above 70Cdeg you need to consider a bigger HS. Remember that when you put the pcb in a closed box, you drastically reduce the cooling air flow! So don’t be fooled by low temperatures when the pcb is sitting on the bench if you are using the supply in an enclosure without forced cooling air. You can attach both ICs to the enclosure walls for heatsinking if you use electrical isolation hardware under BOTH of them.
If the supply voltage cycles OFF and ON when loaded, it means an IC internal temperature switch is cycling off as the chip over-heats. Definitely increase the cooling if this happens. It’s not an appropriate way to operate the ICs .
Component selection is straightforward. Use aluminum electrolytics for C1 and C6. Use tantalum electrolytics for C2,3,5 and 6. You can, of course, use tantalum for C6 and C1. But it’s very pricey. You can also use alum. elect. caps for the 10uF parts, but you must bypass each one with a ceramic 0.1uF, 20V or higher capacitor.
Most DC output wallwarts have an internal bulk filter capacitor ( shown as “?”). If the bottom trough of the WW output ripple voltage is high enough to prevent output deregulation of the supply without adding C1, then you can leave C1 off. HOWEVER, WW supplies are notorious for using marginal components. The WW internal aluminum electrolytic capacitor may degrade rapidly with the high temperature of full power operation. So add at least 200 to 500uF of additional capacitance for C1 as insurance that the total capacitance will remain high enough over time to meet output voltage specs, especially if you are at more than ½ of the WW power rating.
I chose the IC1 part shown because it has a relatively low dropout voltage that allowed me to get 10V out of the 12VDC WW with close to the maximum specified 1A current drain from the WW. If you need lower current from your supply, say 100mA or less, the loaded voltage at the WW output will probably be above 13.5V at the bottom of the ripple trough and therefore ordinary 3 terminal regulators with 3 volts maximum drop can be used for IC1.
Buying a higher current rated WW than you need will give you some extra voltage at the WW output and so allow more voltage across IC1. But remember that the power (Watts) dissipated by IC1 is equal to it’s output current times the voltage drop across it. So having 16V out of the WW for 10V at IC1 OUT requires you dump 3W of heat for 500mA of supply output current (16V-10V=6V, 6V x 0.5A=3.0W). Better to have 12 or 13V if you don’t want to add extra heatsinking. So smaller heatsinks are another good reason to use lower WW output voltage and a low drop regulator for IC1, if you need +/-5V out of the supply.
The above discussion is important ONLY if you want to approach the higher end of the supply capability, which is about 8W for +/-5V output.
That’s
it. Have fun.
Remember that the I x V power in the regulators appears as HEAT and has
to go somewhere! Give it a path to
follow J