by Craig Taylor
I have recently been trying to restore a
Radector radiation survey meter, vintage 1950s. This
instrument uses a 10 atmosphere argon filled ion chamber as the radiation detector and has
an electrometer type vacuum tube sealed inside the chamber.
The design is simple and, for the time, quite elegant. Unfortunately it uses three different mercury
batteries. One large 1.35V for the filament
power, one smaller 1.35V for bias and one 5.4V for the plate supply of the electrometer
tube. Because of the design, the calibration
depends on the voltage of the batteries staying constant over the useful battery life. Mercury batteries maintain a very constant voltage
over most of their life, a characteristic NOT shared by present day alkaline cells or any
other easily obtained batteries.
So. What to do?
I decided that modifying the instrument itself was a bad idea; I want it in original condition. So I can’t modify the internal circuit or
drill holes in it to install switches. What I
want is a drop in form, fit and function battery replacement. That implies that when you switch off the
instrument, the battery drain stops. Building a regulated battery powered supply is easy
these days using integrated regulator-reference combination chips. But, there is a problem. All the existing packaged solutions have a bias
current that is required to run the regulator IC. If
you simply disconnect the load ( turn OFF the existing switch on the instrument ), the
bias current circuit still drains the battery. This
load might be only 100uA or so, but for a 100mA-hr battery that translates to a shelf life
of 1000 hrs, which is 1.4 months. Not good. I don’t want to have to open it up and remove
the batteries every time I finish playing with it, so this is a problem. My solution was to design a supply that shuts
itself off when the “battery” drain drops below the minimum current needed by
the instrument. That lower current drain
implies the instrument has been turned OFF (the internal battery switch is open). Ideally, the new supply should reduce battery
drain such that the batteries are good for their shelf life, which is years for modern
alkaline cells.
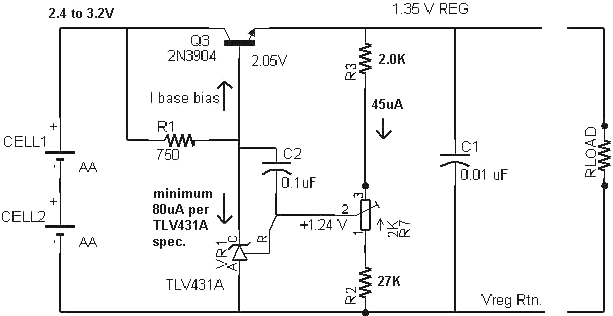
The basic regulator design for the filament supply is shown in figure 1 . It is designed for a load of 25mA maximum.
FIGURE 1
Here is how it works: Current through R1 tries to turn on Q3 such that
the emitter voltage is Vbattery - 0.7V . If
the voltage at VR1-R is higher than 1.24V, VR1-C begins conducting more current and
therefore diverting Q3 base drive. At some
point there isn’t enough current going into the base of Q3 to maintain the output
voltage and it starts to fall. When the
divided output voltage starts to drop below 1.24V at VR1-R, VR1 conducts less current and
leaves more for Q3 base. A balance is reached
with the output voltage just high enough to maintain 1.24V at VR1-R. If the battery voltage drops enough so that the
current through R1 is less than the 80uA (or less) needed by VR1 and enough left over for base
current to support the load, regulation fails and the output voltage drops. This will happen at a battery voltage of about
2.25 V.
Note that, with a fresh battery, the bias
current for VR1 and the voltage divider is about 1.4mA even with the load removed. So this basic circuit doesn’t meet the design
requirements. Figure 2 shows the changes
needed to make it work as desired.
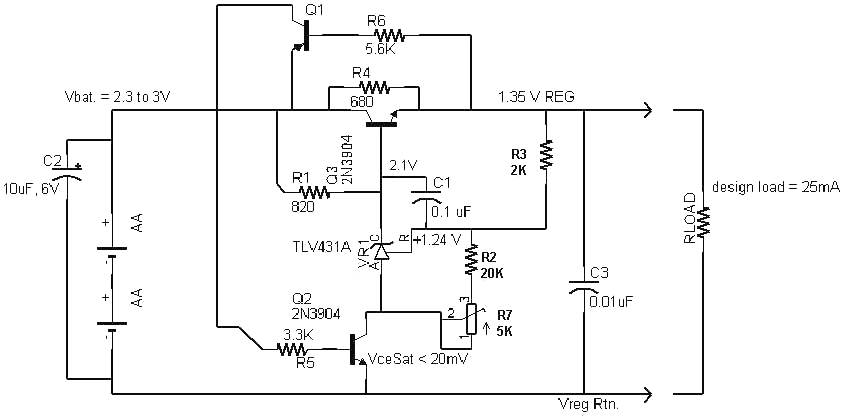
FIGURE
2
There are two more transistors
in this design. The actual ON-OFF switch is
Q2. When ON, it is saturated with a voltage
of less than 20mV between Collector and Emitter. When
OFF, the collector-emitter leakage current at room temperature is less than 10nA, usually
much less. The only point of the regulator
that is referenced to the current return point (Vreg Rtn.) is Q2 emitter. If Q2 is OFF, there is no path for current to flow
from battery plus to battery minus. That’s
about as “off” as I could make it.
Q1 is the load sensor. It can be almost any pnp silicon transistor you can
find. If less than about 0.5 mA is flowing
through R4 (into the voltage divider and Load), there isn’t enough voltage drop (5E-4
x 6.8E2 = 0.34V ) to turn on Q1 (needs about .55V or so to start conducting). Therefore no current is flowing out of the
collector of Q1 and into the base of Q2. Once
the load current exceeds about 0.8mA, Q1 starts conducting and turns on Q2. At loads over a few mA, both Q1 and Q2 are
saturated and regulation becomes accurate. For
my application the load is about 22mA, more
than enough to saturate Q1 and Q2.
If this gadget is going to be run at
temperatures much greater than 40C, a 100K resistor should be connected between Q2base and
Q2emitter to divert any leakage from Q1 and prevent Q2 from trying to turn on.
Note that the 50uA needed by the
voltage divider is not
enough to “hold on” the regulator when the remaining external Load is removed.
The saturation voltage of Q2 will vary by 7 to 12 mV as the base bias current changes with changes in battery voltage. The result is a change in regulated output voltage of 7 to 12mV. If that error is a problem in your application, you can replace Q2 with an N channel mosfet with a Vgs ON of less than 2.2 Volts and Rds ON of less than 5 Ohms. It needs to maintain a relatively constant Vds over a gate voltage range of 2.2 to 3.0V to perform any better than the bipolar 2N3904. The Vishay TN0200 looks like a good choice, but I haven’t actually tried. If you decide to use a mosfet, connect a 470K resistor between the mosfet gate and source to sink leakage current. Remember that the DC input impedance of a good mosfet is almost infinite and any leakage current could cause it to turn on.
![]()
5.4 VOLT, 120uA
MERCURY BATTERY REPLACEMENT
This
supply replaces a battery of 4 mercury cells that produces 5.4 Volts.
It powers the electrometer tube plate circuit in the ion chamber
amplifier of the Radector radiation survey meter.
The plate current varies as the ion chamber receives more or less
radiation, but it stays within a range of 30
to 120uA for normal instrument calibration and operation.
This means that the choice of designs for the power supply is wider than
for the previously designed 25mA filament supply.
For several reasons, mostly because I thought it would be more
interesting, I decided to use a linear shunt regulator.
Shunt
regulators have been around a long time. TVs
have used them to control the 15kV+ supply for the CRT electron gun since the
1950s, for example. They are
possibly the simplest of the linear regulator family.
The classic shunt regulator is a series current limiting resistor and a
Zener diode to ground (see Figure 1 ). The
output voltage is limited to the Zener voltage with excess current “shunted”
to ground. If the supply voltage
and load current are stable, it works great.
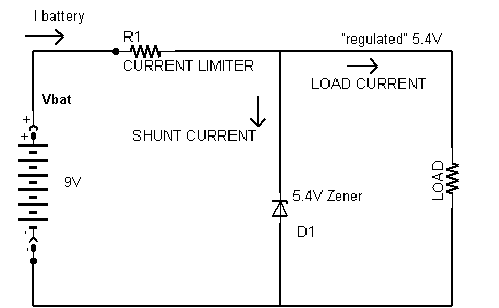
FIGURE 1
One
of the first things to notice is that the maximum current available to
the load is [ Vbat - 5.4V ] / R1 .
If the load requires more than that, the output voltage drops and you no
longer have a regulated voltage. So
you have to choose R1 to supply the maximum current ever needed by the load when
the battery voltage is the lowest it will get.
Usually you choose a “dead battery” voltage such that about 80 to 90%
of the energy has been extracted from the battery. For an alkaline battery, that might be around 1.15V per cell
( 1.5V new ). There is a small
problem, though. If the battery
voltage is higher than the minimum or the load requirement is less than maximum,
the extra current gets dumped in the Zener and turned into heat.
This type of regulator is not the most efficient type for widely varying
line voltage combined with large load current changes.
You end up with too much power dumped in the Zener shunt element or the
current limit resistor. Also, 5.4V
Zeners have a soft “knee”, which means their clamping voltage changes with
current (and temperature!), especially in the sub 1mA range.
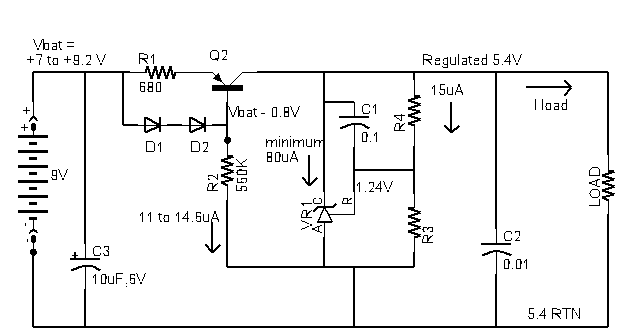
There is an integrated circuit available that acts something like a programmable Zener and can sink up to 20mA; the TLV431. I used it in the 1.35V, 25mA design (see above) as the voltage reference and error amplifier for the series pass transistor. It can also be used by itself as the shunt element in a shunt regulator. I show it (as VR1) in a “simplest possible” 5.4V regulator design in Figure 2.
FIGURE
2
I
put in the numbers for a 5.4V ,120uA regulator
with a battery voltage range as shown in the figure.
This
won’t actually work in my application because it doesn’t disconnect the
battery from the regulator when the load current goes to zero.
But it shows everything needed to understand the design variables in a
shunt regulator. Here’s how it
works: We assume the system is
“in regulation”, which makes the load voltage 5.4V. VR1 requires a minimum
of 80uA to run it’s internal circuitry. The voltage divider requires about 15uA.
Added up, the worse case load current is 120+80+15=215uA.
I apply the engineering fudge factor and decide that 250uA is a good
working number. This 250uA has to
come through the limiting resistor R1, so if the minimum battery voltage for
operation is chosen as 7V, the resistor value has to be:
[7V-5.4V]
/ 250uA = 1.6/2.5E-4 = 6.4K Ohms
The
next smallest 5% resistor value is 6.2K, so that’s our value for R1.
Now we can calculate the worst case current drain from a new battery:
[9.2
- 5.4] / 6.2E3 = 613uA
Oh
my! That’s about 5 times the
maximum load requirement. Seems a
bit wasteful. If we had a device
that we could substitute for R1 that only passed 250uA no matter what the
voltage difference across it, we could more than double the battery life.
There is a theoretical device called a Current Source that does just
that. Unfortunately, it doesn’t
exist. But we should be able to do
better than a resistor, with a little thought.
Figure 3 shows the regulator from figure 2 with an “imperfect” current source (R1,R2,D1,D2,Q2) in place of a resistor.
FIGURE
3
Here
is how the current source works. The
collector of Q2 supplies current to the rest of the regulator, but that current
depends on the base-emitter current in Q2, not the emitter-collector voltage (as
in a resistor). The current in R2 splits to flow through R1+base-emitter diode
or D1D2, more current going to the lowest resistance.
If it flows through R1 it is amplified by beta, the transistor gain,
which is typically over 100. So
each uA flowing in the base causes 100uA to flow in the emitter-collector
terminals and, of course, through R1. This
current causes the voltage across R1 to rise until all but a few uA of the R2
current is shifted to the two diodes. The
result is that the current in R1 is held constant and equal to the difference in
the voltage drop between the base-emitter junction (0.63V) and the diodes
(0.79V). So the current is set to :
[0.79 - 0.63 ] / 680, or about 240uA.
This
will change some with battery voltage, which controls the current in R2.
R2 current flowing through D1D2 causes a change in the diode voltage.
Silicon diodes don’t make good voltage references, but the “sloppy
current source” works much better than a resistor as the current limiting
element. Of course, it takes 4
additional parts. Nothing’s free.
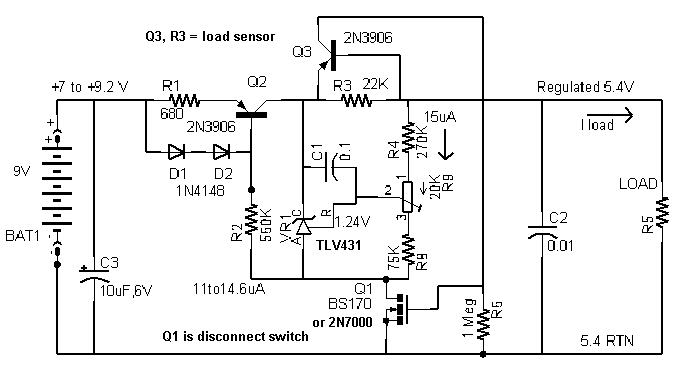
FIGURE 4 - final design
Breadboard
testing of the complete design (figure 4), including load sensor and disconnect
switch, showed that the 431 installed in the circuit works quite well down to
36uA, so I set the VR1 minimum current to 40 instead of 80uA and ran the numbers
again. Final value of R1 was
determined by breadboarding the circuit and testing it under maximum load with
varying input voltage.
The
experimental results for the current limiter output were 202uA for a Vbat of 7V
and 240uA at 9V. If we had used a
resistor designed for 202uA at 7V, the current would have been 628uA at 9V . That is enough savings in current to justify the added parts,
I believe.
If
you want to run the current regulator circuit at temperatures outside of the
usual “room temperature” range, you need to test for temperature
sensitivity. Both the diodes and
the Q2be junction will change voltage drop for a given current as temperature
changes. A quick and dirty test
using my hand to warm up D1, D2 and Q2 caused the emitter current to drop by
11%. If it gets hot, your design
could stop regulating at lower battery voltage, so compensate by designing for
higher current.
An
interesting experiment is to substitute an infrared LED for the D1-D2 pair.
The voltage drop should be almost the same, but the led should have a
better “knee” than the diode pair. There
is an IR led in most optocouplers, if you can’t find a discrete part.
I measured 0.75V on a 4N25
from my parts box. Have fun!
CRAIG
TAYLOR 26 FEB 2004