
| The familiar astable flip-flop circuit is a handy configuration for making flashers or generating squarewaves. Here is a typical alternating LED flasher with the LEDs in the emitters instead of collectors as is normally done. (There is another good reason to put them in the emitters - see Karen's note below. ) The bias resistors are directly connected to the supply and are chosen to have a value about 100 times the collector resistor for ordinary gain transistors. The flashing period is approximately the product of this resistance and the capacitance which is about 1 second for the circuit as shown. The 470 ohm resistors set the LED current and may be reduced for lower battery voltage but remember to also reduce the bias resistors. If no LEDs are desired, the emitters may be directly connected to ground and two out-of-phase voltage squarewaves are available on the collectors. | 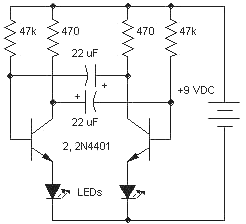 |
| This is another version of the circuit that uses negative feedback for the bias. This technique is generally more desirable because the feedback ensures that both transistors are in a high-gain, linear mode when power is applied. In actual practice the first circuit will often work "better" with ordinary bipolar transistors since there is no negative feedback slowing the switching. The feedback makes the circuit more immune to parameter variations due to temperature changes, gain variations, or even component substitution. | 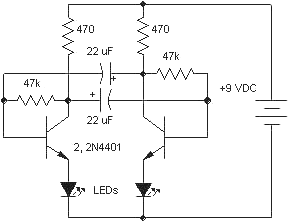 |
| This version will work with just about any NPN darlington transistor. The bias resistor may be much larger due to the high gain of the darlington so much lower value, non-polar capacitors will give a suitable flash rate. Of coures, other applications may require different oscillation rates which are easily achieved by changing the capacitor value. Other voltages and currents may be accommodated by changing the collector resistor value. PNP versions of all of these circuits may be built by reversing the polarity of the battery and polarized capacitors. The high gain of the darlingtons makes it feasible to handle heavy loads either in the emitters as shown or in place of the collector resistors as is commonly done. Lower value bias resistors may be necessary depending upon the load current and the gain of the transistors. | 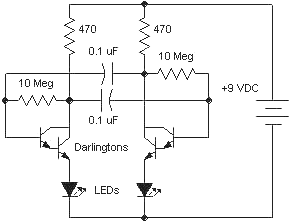 |
| Here is an unusual way to get more power out of the astable flip-flop without resorting to huge capacitors. The emitter current flows through the base-emitter junction much like the LEDs above saturating the output transistors. The 2N4401 can handle up to 600mA in this circuit but a higher current transistor may be substituted. The base current of the output transistor may be adjusted by changing the 470 ohm resistor, as needed. | 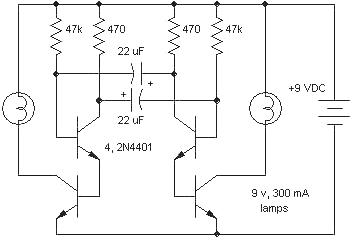 |
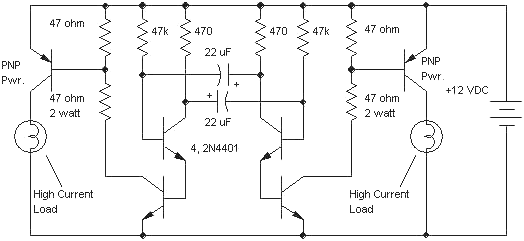 |
Adding another power transistor on each side brings this flasher into the 10 amp range using ordinary bipolar transistors. Only one side needs the extra transistors if only one flashing lamp is required. Just ground the emitter of the low power side. |
| The loads may be placed in the collector circuits as this darlington flasher illustrates. The lamps should be rated near the voltage of the power supply. | 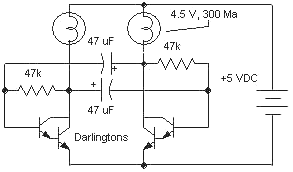 |
| Mosfet power transistors will work in most of these circuits as long as the negative feedback biasing is used. A capacitor is needed across the mosfet circuit and is generally a good idea in all of the circuits. Some mosfets will exhibit RF oscillations in this circuit (the VN67, for example). Transistors that worked well were: VN10KM, VN88, SK3165, and IRF531. Most power mosfets that require only a couple of volts to turn them on will work up to their current and power ratings. | 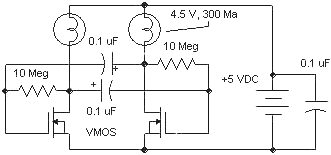 |
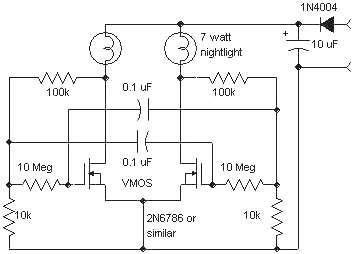
| Here is a
way to use the circuit at high voltages. The voltage divider resistors
in the gate circuit limit the gate voltage to safe levels. The circuit
shown flashes two ordinary 7 watt nightlights but the input voltage must
be only 90 VRMS. If the flasher is to be operated directly of off the
rectified line voltage, add an 820 ohm, 2 watt resistor in series with
each lamp. One lamp may be replaced with a 10k resistor if only one
flashing lamp is required.
Warning: This circuit uses potentially deadly voltages and should be constructed only by qualified persons. |
 |
| These circuits are useful for purposes other than flashing lamps. Here is a simple tone generator driving a 16 ohm speaker at about 2.5 kHz with plenty of volume (set by the 22 ohm). Note the non-symmetrical values. There is no need to waste power in the transistor that isn't driving the load. To get a 50/50 squarewave the product of the bias resistor and capacitor values connecting to one base should be close to the product of the others. (47k X 0.01 is close to 2.2k X 0.22.) |  |
| Since the circuit uses non-symmetrical values, the total current drain will be a squarewave, too. This circuit for a code-practice oscillator oscillates near 1kHz. Notice that the speaker, key, battery, and circuit are all connected in series. This "two-wire" feature can be handy in some situations. A fairly large capacitor is connected across the circuit to make it work properly and this capacitor has a low-pass effect on the squarewave the speaker sees and its value will depend upon the desired frequency. | 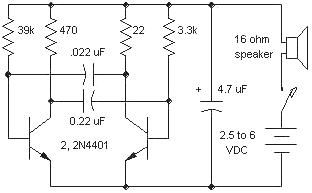 |
| These circuits shown so far are basically a two-stage AC-coupled amplifier with the output fed back to the input through another capacitor. Redrawing the circuit and using DC-coupling between the stages gives this circuit. Emitter degeneration was added to one stage and the resistor values were modified to get both transistors into the active region. The problem with DC-coupled amplifiers is that the high gain can result in the last transistor being fully on or off unless care is taken. | 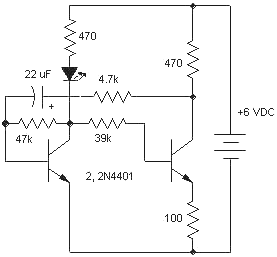 |
| Here is the standard flasher circuit seen in many hobby books with the exception that the bias resistor is connected from collector to base for better reliability. Note that it is also a two-stage amplifier with DC coupling but by switching to a PNP, the biasing is a little simpler. Most engineers looking at this circuit want to add a resistor from base to emitter on the PNP or from the collector to plus on the NPN but the circuit works OK without either. | 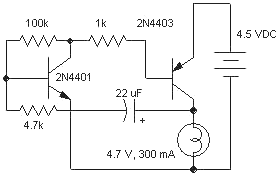 |
Have fun designing your own flasher. The circuit will need sufficient non-inverting gain to achieve oscillation which probably means at least two transistors. Make sure that the two or more stages are "alive" by biasing them away from ground or the power supply voltage. Then apply the feedback and try to figure out what happens when the circuit switches from being a linear amplifier into a switching, non-linear flip-flop. If the gain is sufficient and non inverting, something will happen!
Here are some notes from readers:
Karen mentions that, " there is a practical supply
limit on the good old fashioned two transistor astable, and in fact any timing
ciruit that uses a reverse-biased BE junction. Between 5V and 9V most
reverse-biased BE junctions go into zener mode. Explains why they were never
shown with supplies in excess of about 6V!" Good point, Karen! When one
collector pulls down, the voltage on the base of the other transistor will be
pulled below the emitter voltage by nearly the supply voltage. I would
recommend adding diodes in the emitters much like the LEDs in the first circuits
for operation above 6 volts.
Thought I would pass this along. I was using the "Astable Flip Flop Circuit" page and setting up the first example, the "flip flop flasher". I added a potentiometer between the power supply and the two 47K resistors and came up with a single component modification that will adjust the flash rate. I removed the 47K resistors from the power supply and connected them to one end of a 500K VR. I connected the opposite end of the 500K VR to the power supply. The center tap gets connected to either side of the VR producing a 0 - 500K (slow to fast) or 500K - 0 (fast to slow) range.
Trial and error shows that the second circuit, "With negative feedback bias", can be adjustable using a 10k resistor and a 0-100k variable resistor in series between the two transistor bases.
Jay Herde Louisville KY
Thanks Jay!
Jay's first modification connects the bases together somewhat but since one is directly connected to the collector of the other transistor through the capacitor, the switching still occurs. There might be a problem if the potentiometer is much higher in resistance than the resistors, especially if the transistors do not have similar characteristics. A small capacitor, maybe 10% of the timing capacitors, connected to ground at the junction of the bias resistors and potentiometer might fix any problem. Jay's worked with a pot 10 times bigger than the resistor so perhaps the problem is minimal.