
No, its not Aladdin's lamp with a genie inside. This magic lamp appears to be an ordinary frosted light bulb with a rather unusual characteristic. Whenever your finger is touched across the base threads and center contact the lamp magically lights! Without wires! It is a most effective illusion if you don't make a big production, "Hey! Check out this magic lamp!", but instead casually remove the bulb from a package of new bulbs and pretend to not notice when it lights. When your victim gasps and grabs the bulb for further investigation just explain away the flash as some sort of static electricity effect and act indifferent.
Construction will probably involve several attempts unless you are familiar with glass working. Collect several old burned-out light bulbs and learn to remove the base without breaking the glass. The bases are glued on fairly well but with gentle prying and twisting they will break loose.
Try not to scar the metal base too much if you want to reinstall it or alternately just peel it off and get a pristine base by breaking away the glass on another bulb. Now the really tricky part is to break off the bottom of the bulb without shattering the whole thing. A glass cutter may be used to score a ring around the base to encourage the desired break. This break should be near the bottom so that when the bulb is remounted on the base the break will not show. Keep your fingers out of the inside of the bulb so that the frosting doesn't get a greasy fingerprint.
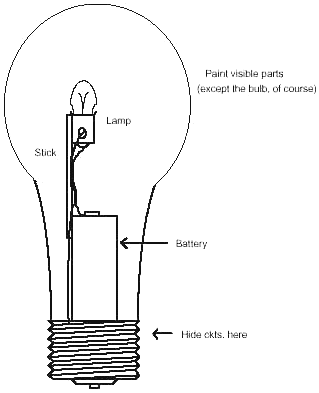
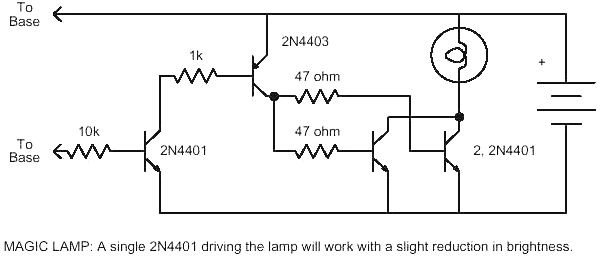
Several factors should be considered when selecting a battery and lamp combination. First, the weight should be kept low if the victim will hold the bulb. Second, the lamp should be as bright as practical and should emit light in an omnidirectional pattern. Try those "super Krypton" flashlight replacement bulbs and two AAA cells or one AA cell. A simple version may be constructed by connecting the battery, bulb and base in series such that the circuit is completed when a penny is connected across the base. The more sophisticated version shown in the diagram will respond to the resistance of moist skin and therefore requires less manual dexterity. Mount the circuitry as deep in the base as possible so that it doesn't show through the glass and mount the battery vertically out of the base by securing it with a good quality epoxy. Paint the battery, wires, and components white so they don't show then fasten the bulb back into position with hot-melt glue. Hot-melt glue will allow easy disassembly when the battery needs changing.
Just when you get all comfy in bed you hear it.... Drip....Drip....Drip. But when you stumble into the bathroom to give the faucet a twist, the dripping sound stops. After a few trips back and forth you venture out without turning on the lights- to "sneak up" on the drip. The only problem is that you can't see anything! Well, this fate can befall a friend (hereafter referred to as "victim") with a little help from you and the Dripper. The Dripper produces a slow dripping sound but only when the lights are off. The circuit is based on a low power version of the two-transistor flasher and should run on a 9 volt battery for weeks.
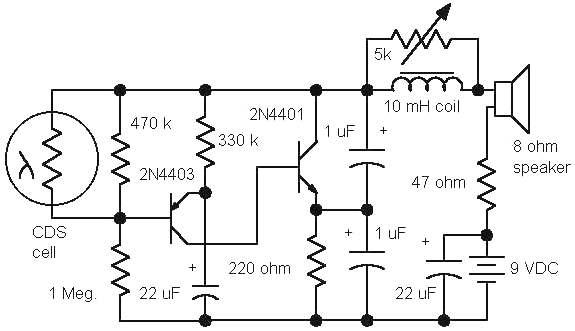
This new circuit uses regeneration to increase the ringing of the tuned circuit that produces the chirp sound. The circuit is therefore less sensitive to transistor gains and inductor Q. The potentiometer across the inductor controls the chirp length. A short chirp will sound most like a drip whereas a longer chirp sounds like some sort of insect. The CDS photocell is optional and will cause the dripping to stop when the lights are turned on.
Here is how it works:
When dark, the photocell has a very high resistance and the voltage on the base of the 2N4403 is set by the two resistor to about 6 volts. The emitter capacitor begins charging toward this value through the 330k resistor which determines the drip rate. When the emitter voltage rises above the base voltage the two transistors turn on and the 2N4401 quickly begins to oscillate at an audio frequency. The 22uF capacitor on the emitter quickly discharges and the circuit switches off and the whole process begins again. The turn on click followed by the short audio oscillation creates a realistic "pit - tink" dripping sound when the pot is adjusted properly. Different values will give different effects and experimentation can be entertaining. Transistor substitutions will usually work well.
Do you have an incessant channel hopper that is driving you crazy? Or perhaps you simply want to enforce your own selections. The TV Remote Control Jammer will do the trick.
This circuit is a redo of an older design which is not effective on modern remotes. Modern remote controls are hard to jam but with a little care this circuit will do the job. The circuit is just a flasher operating at 40 kHz which is the carrier frequency used by common remote controls. The strong 40 kHz infrared flashing interferes with the signal from the remote.
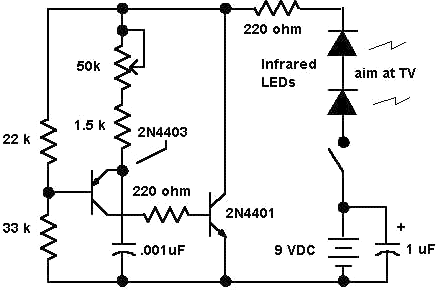
The 50k potentiometer is adjusted to achieve a 40 kHz flash rate (around 20 kohms) and this adjustment is fairly critical. When it is set properly and the LEDs are pointed directly at the receiver's photodiode, the remote control will stop working. The LEDs are operating at about 30 mA when on but the duty cycle is low and the circuit only draws about 7 mA.
Trouble may be encountered if the frequency is set wrong, the LEDs are not pointed correctly, or if the remote is a real brute. More light may be had by adding another resistor and diode string from the collector to the switch but the most likely problem is the frequency adjustment. Use a 10-turn pot and adjust it slowly while changing channels. Or use a frequency counter or oscilloscope to set the frequency, if possible. Make sure that the current drain is about 7 mA - if not, check the polarity of the diodes. A photodiode infrared receiver is handy for checking the light output and comparing it to the remote's.