
You have probably seen "magic lamp" circuits in which an ordinary incandescent bulb is lit by a match. These circuits rely on a hidden temperature or light sensor and are not particularly interesting. I decided to make a magic lamp, too! But, to make it more interesting, I decided to just use plain old magic for this circuit instead of resorting to any hidden components.

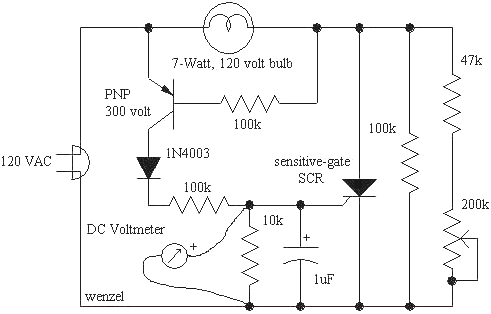
The components are not critical and substitutions are possible. The SCR is an ordinary sensitive-gate type like the 2N5064 or other type designed for 200 volts or more, the PNP transistor is a high-voltage type like a MPSA-92 or a 2N6520, the 1N4003 diode is an ordinary rectifier with a breakdown voltage of 200 volts or more. The 1uF capacitor is any low voltage type and the resistors are ordinary 1/4 watt types. The 200k potentiometer could be a trimmer type but a panel-mount type may be more desirable since this circuit does require a lot of tweaking. Use an insulated shaft, however. All points in the circuit can shock. The lamp is a clear 7-watt bulb typically used in night lights. White or frosted bulbs will not work as well.
Note: If the lamp ever lights during the following adjustment process, remove the power for several minutes before starting over and wait a couple of minutes after applying power before making adjustments. This is an "expert tweaker" level circuit and might drive the beginner crazy. A beginner shouldn't build line-powered devices anyway!
The DC voltmeter is an ordinary digital VOM set to the 2 volt scale and is used for adjusting the potentiometer. Set the pot to the highest resistance and then apply power to the circuit. If the bulb lights immediately, you will need to increase the 100k resistor in parallel with the pot. If it doesn't light immediately, slowly reduce the resistance on the pot until the voltmeter starts to show a voltage. The SCR will trigger and the lamp will light when the voltage reaches about 250mV. Remember the exact voltage. Turn off the circuit, wait 5 minutes, reapply power with the pot set to the high end and begin approaching this trigger voltage again. Stop when the voltage is about 50mV below the triggering point. Hold a flame near the bulb and the voltage should begin to climb toward the trigger point. (You can use a flashlight instead of a flame for testing purposes.) After a few seconds the lamp will light. Magic!
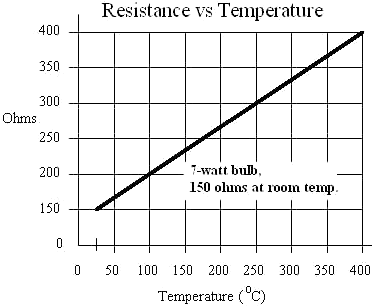
Unfortunately, this "magic" isn't particularly stable and frequent adjustment may be required. Some bulbs may require a larger or smaller resistance across the SCR than can be obtained with the values shown. If the bulb will not light at any pot setting, reduce the 100k in parallel with the pot to 47k. If it won't stay out, increase the 100k and possibly the 47k. After a little experience you will be able to make the adjustments without the meter. The bulb in the prototype measures 150 ohms at room temperature. Another identical looking bulb measured 300 ohms which is more typical of the little night-light bulbs that vary from 4 to 7 watts.
By now you probably get how it works! The tungsten in the bulb has a pretty steep temperature coefficient and since it is in the good thermal insulation of a vacuum, it is easy to heat with moderate light levels. In fact, a small flashlight can heat the filament to 50 C and a nearby 60 watt bulb can raise the temperature to over 200 C! (I recently changed these numbers after additional testing. The original value of 400 C rise for a 60 watt bulb seemed too high to be possible and it apparently was. Maybe I switched the two bulbs or I was working in Fahrenheit! I've also noticed that some filaments don't absorb the radiant energy as well as others, perhaps due to surface color or texture. I wonder if a used bulb is more sensitive due to a darkened surface.) A tiny penlight will raise the temperature of the prototype's bulb over 1/2 degree from across the room! These temperature increases result in significant resistance changes as the chart below indicates:

Tungsten Filament 7-watt Lamp
The resistors and potentiometer across the SCR cause a couple of mA to flow in the dark lamp and when the value is set just right, the transistor is on the verge of conducting at the peaks of the line voltage. A bright light heats the filament and, as the bulb's resistance increases, the voltage across the bulb goes up. The transistor starts passing pulses at the peaks of the line voltage that charge the 1uF triggering the SCR. Once the SCR triggers the lamp lights and shoots up in resistance, and the circuit latches on. Power must be removed for several minutes to reset the circuit because it takes quite a while for the filament to cool to room temperature. The 1uF capacitor prevents the SCR from triggering due to the turn-on transient.
This fun demonstration of some properties of the ordinary incandescent bulb suggest other projects. The filament is a low resistance and will exhibit little noise so it should be possible to place a couple of bulbs in a bridge to achieve an extremely sensitive radiometer (one bulb shielded from light). Some other ideas include a light meter, optical isolator, beam-break detector, solar radiometer (Just how hot does the sun get a filament?), flame monitor, and solar panel positioner. Or an unusual gain control; many years ago Hewlett Packard used a similar bulb to stabilize their audio oscillator but the energy to heat the filament came from current flow, not light. One bulb illuminating another for gain control would be unique, if not practical. Many photoelectric projects will seem amazing with a light bulb as a sensor in place of a photocell! Other type bulbs may be worth investigating, too. Choose a high voltage, low wattage bulb to get a high resistance filament. For example, a tiny #387 type (28 volts at 40 mA) has about 1/2 the resistance of the larger night light bulb and it makes an excellent detector. For most light sensing applications, apply only a volt or two across the bulb to keep self-heating down.
More experimental results:
Using two #387s in the bridge configuration described above and feeding a differential amplifier with a gain of 500, a radiometer with surprising stability and sensitivity was realized. It drifts around a little but this detector can easily detect the infrared from an IR LED and a soldering iron and the sensitivity to light is also excellent. (It is fascinating to see.)
A 100uA meter was connected across the bridge in place of the differential amplifier and a 60 watt lamp held near one bulb gave a near full-scale reading. (Exposure meter!) The bridge voltage was increased to 9 volts for this experiment. The bridge circuit is nothing more than the two lamps in series across 9 volts for one leg and a 1k ohm potentiometer connected across the 9 volts for the other leg. The diff amp or meter connect between the wiper of the pot and the point where the two bulbs connect together. The pot is adjusted for a zero reading.
Here is a somewhat impractical but interesting idea:
Car taillights have two filaments in one bulb. How about a circuit that watches the turn signal filament to determine if the taillight is functioning properly? It would only work when the brakes and turn signals were not in use but it would still be handy and could be done remotely without running additional wires or fibers as done in some cars. A bad brake/turn signal filament is already easy to spot since the rate of flashing changes when one is bad.
Update - I just checked a taillight bulb and determined the higher current filament increases from about 0.5 ohm to near 1.5 ohm when the taillight filament is illuminated. A 3 to 1 change should be easy to detect! Reversing the roles of the filaments results in a 2 ohm to 9 ohm change.
![]()
Reader Tom Bruhns suggests using a light bulb to measure and possibly control your oven's temperature! In this application the bulb is acting as a simple temperature sensor. Ordinary light bulbs can take the extreme temperatures in an oven - there is already one in there, after all. Come to think of it, other lamps might serve as thermometers when not "lit", the refrigerator being one example. The use of the lamp for light might degrade the calibration due to filament aging but temperature measurement/control applications could benefit from the use of a dedicated light bulb sensor. Bulbs, after all, are made from corrosion and temperature resistant materials and the filament is sealed inside a protective vacuum. I can't think of a superior temperature sensor available at the local convenience store!