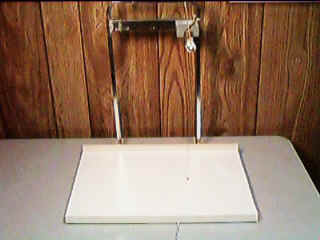
Hot wire foam cutters are a must when working with polystyrene foam because they make neat, straight and smooth cuts that simply cannot be duplicated with any other type of saw. Most cutters are hand-held devices looking much like a cheese cutter without the roller and operate a bit like a jig saw. The foam cutter described here is more like the "table saw" version of hot wire cutters featuring a large work surface with plenty of clearance on all sides and with generous height for cutting thick pieces.
The cutter was made from whatever scrap materials were on hand and each component could be built any number of ways. The base surface should be smooth so that the foam can be easily manipulated and suitable materials include counter-top laminate, high gloss wood, or simply a piece of Melamine shelving as was used in this version. The base dimensions are about 12" x 16". A piece of inside corner molding was placed along the back edge of the base to act as a cutting guide for straight cuts. The molding is glued down "backwards" to get a nice right-angle edge. A rectangular cross section strip of wood would serve the same purpose.
The vertical support could be a piece of plywood fastened to the back edge of the base or the rest of the Melamine shelf. This design uses a metal handle from an old electronic instrument. Make the height a little more than 12 inches so that the cutter can accommodate 1 foot foam thickness.
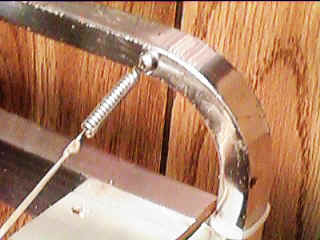
An arm extends out about 1/2 of the base depth which, in this case, is about 6". The arm in this model consists of a block of wood, a long phenolic standoff, and a ceramic insulator. The nichrome wire will stretch quite a bit when it gets hot and some mechanism is needed to keep the wire taut. The block of wood is fastened loosely to the vertical support with two screws so that it can pivot up and down a small amount and a spring was added to pull up on the arm.
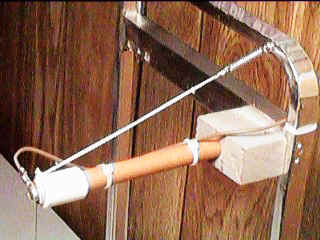
The phenolic standoff and ceramic insulator were held together with short piece of threaded rod made by cutting the head off of #8 bolt. First, the threaded rod was screwed into the ceramic insulator until it bottomed out and then the other end was screwed into the standoff using the ceramic insulator as a handle. The top wire connection is made with a screw in the end of the ceramic insulator. The hookup wire has a solder lug termination and the nichrome wire was simply wound around the screw a couple of turns. During assembly, the arm is held down as the screw is tightened. A little bit of experimentation will be necessary to get the spring tension right when the wire is hot.
A 3/16" hole was drilled directly beneath the arm for the other end of the hot wire. In order to keep the hot wire from touching the wood, the hole was partially drilled out to 1/4" from the bottom side and a short 1/4" O.D. metal standoff was tapped into the hole from the bottom. The standoff should be much shorter than the thickness of the base so that it does not act as a heat sink for the cutting portion of the wire. In this design the bottom electrical connection was made by inserting a piece of hookup wire into the standoff with the nichrome wire and then forcing in a sheet metal screw. The nichrome is difficult to solder so some sort of mechanical crimp or weld is needed.

The two ends of the hot wire are connected to the power source with the two lengths of hookup wire. The power supply for the hot wire will depend upon the gauge of wire and the length. Plan on supplying about one watt per inch. In this design, the wire is 32 AWG and has a resistance of about 10 ohms per foot making the total resistance about 13 ohms. A surplus 13 VAC, 1.5 A molded transformer was used for the power supply which results in about 1 amp of current and about 13 watts of power which is just perfect for the 13 inch length. It may be desirable to have a higher power setting available (higher supply voltage) but the wire can become excessively hot when it is not cutting. It is best to simply cut more slowly. My original nichrome wire snapped and I replaced it with some stainless steel wire and this new wire is much stronger and works great. Stainless steel does increase in resistance as it heats up so use about 1/3 its measured room temperature resistance when doing the calculation below.
Here is how to calculate the necessary power supply voltage (AC or DC is fine): measure the resistance of the desired length of nichrome wire and multiply this resistance by the length in inches. Now take the square-root to get the required power supply voltage.
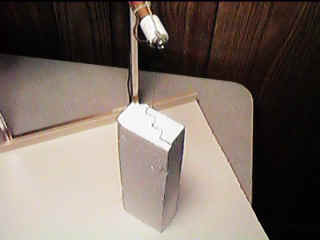
This tall cutter will come in handy for a variety of craft projects or for fabricating special shaped foam components. An example of a difficult cut is shown below where a "staircase" is being cut from a thick piece of shipping foam. The finished steps are painted to look like old, cracked concrete - a perfect application for the surface texture the cutter leaves behind!